Thursday, May 20, 2010

Good bye yellow

As I've been trying to make our family room fit our style, I've mostly been concentrating on the simple things like accessories. Okay so every update in our family room so far has been accessories. That's because I've been a little nervous to tackle the project I really wanted to do. Paint the ugly dated yellow oak wood. Because I was a bit nervous about stripping lacquer, sanding, painting and then giving everything a coat of poly without ever doing those things to finished wood before, I opted to start with the mantle.

I figured since it was the smallest piece of the offensive yellow oak in our house, it wouldn't be that time consuming and a good piece to start on. Plus I'm not really in love with it's shape or details so if I completely destroyed it, I wouldn't be too heart broken. I even figured I could make a simple, clean lined mantle out of 1x6's using the new found skills I've gained from reading the Knock Off Wood blog (I'm working on a console table for the entry way and a new coffee table for our living room right now).

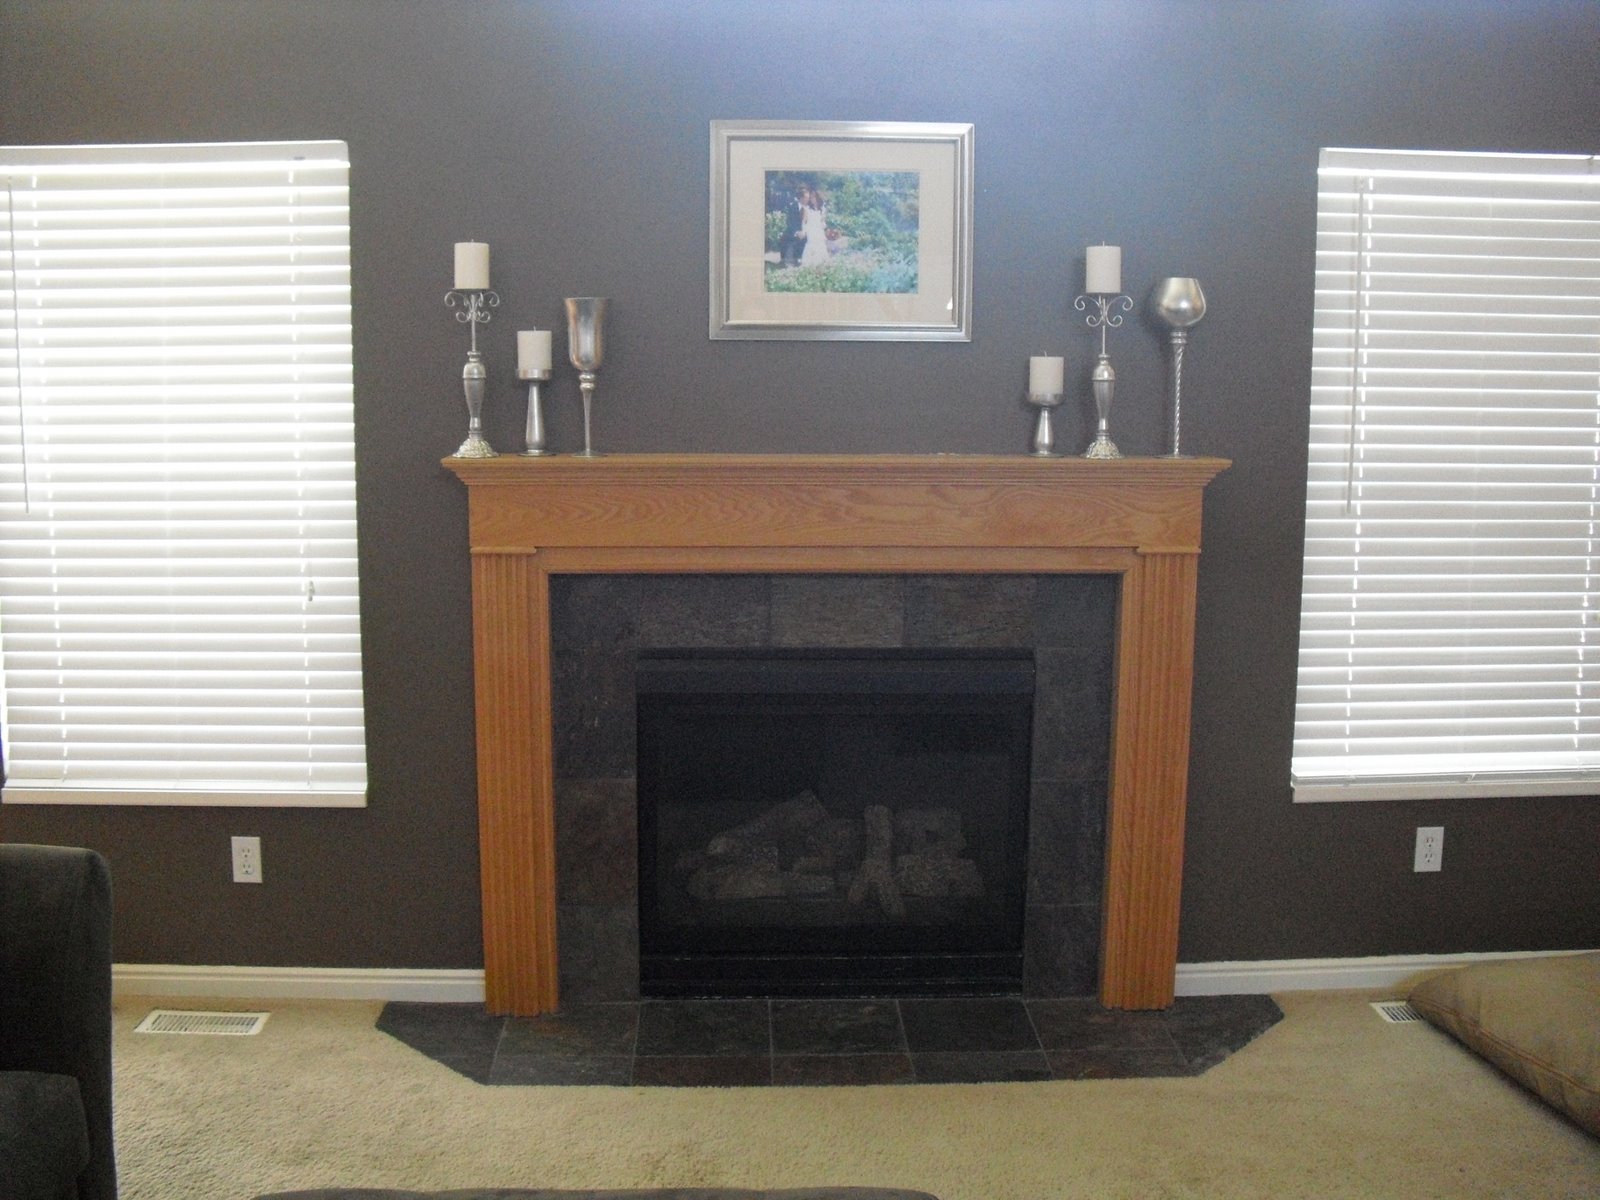
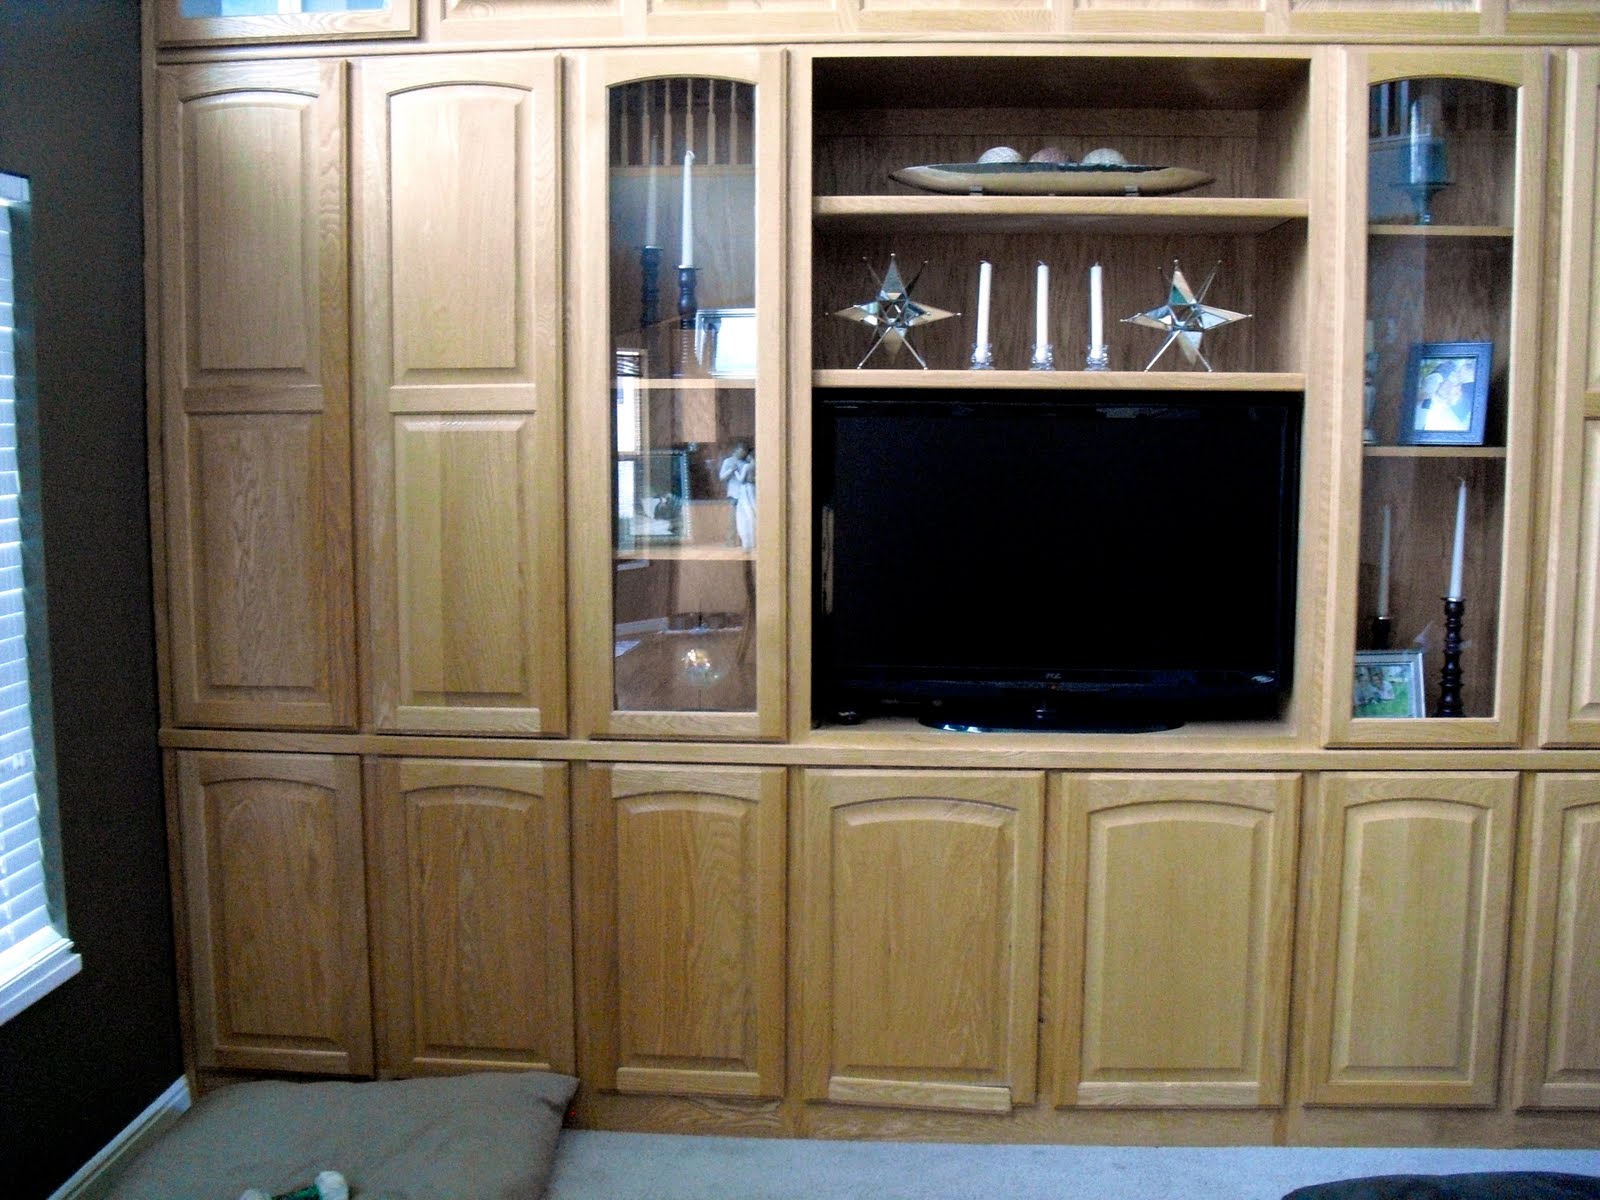
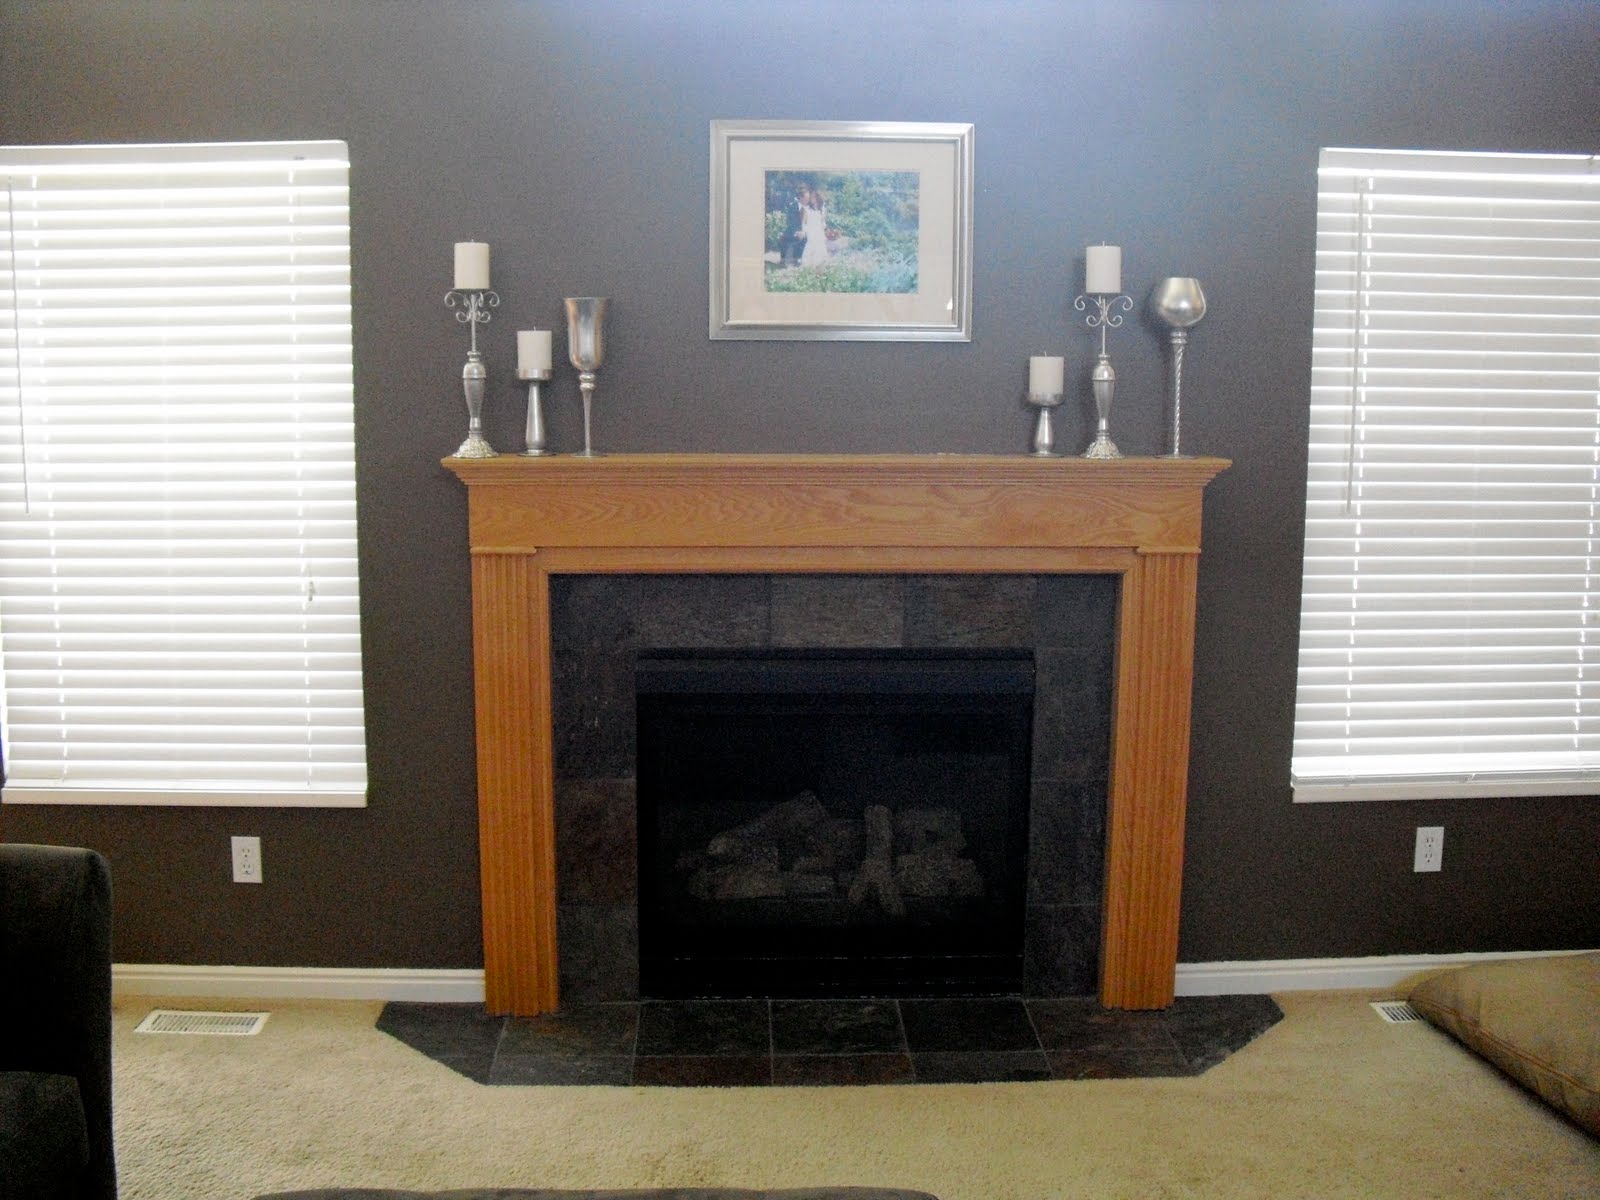
Here's what the fireplace looked like before.
 

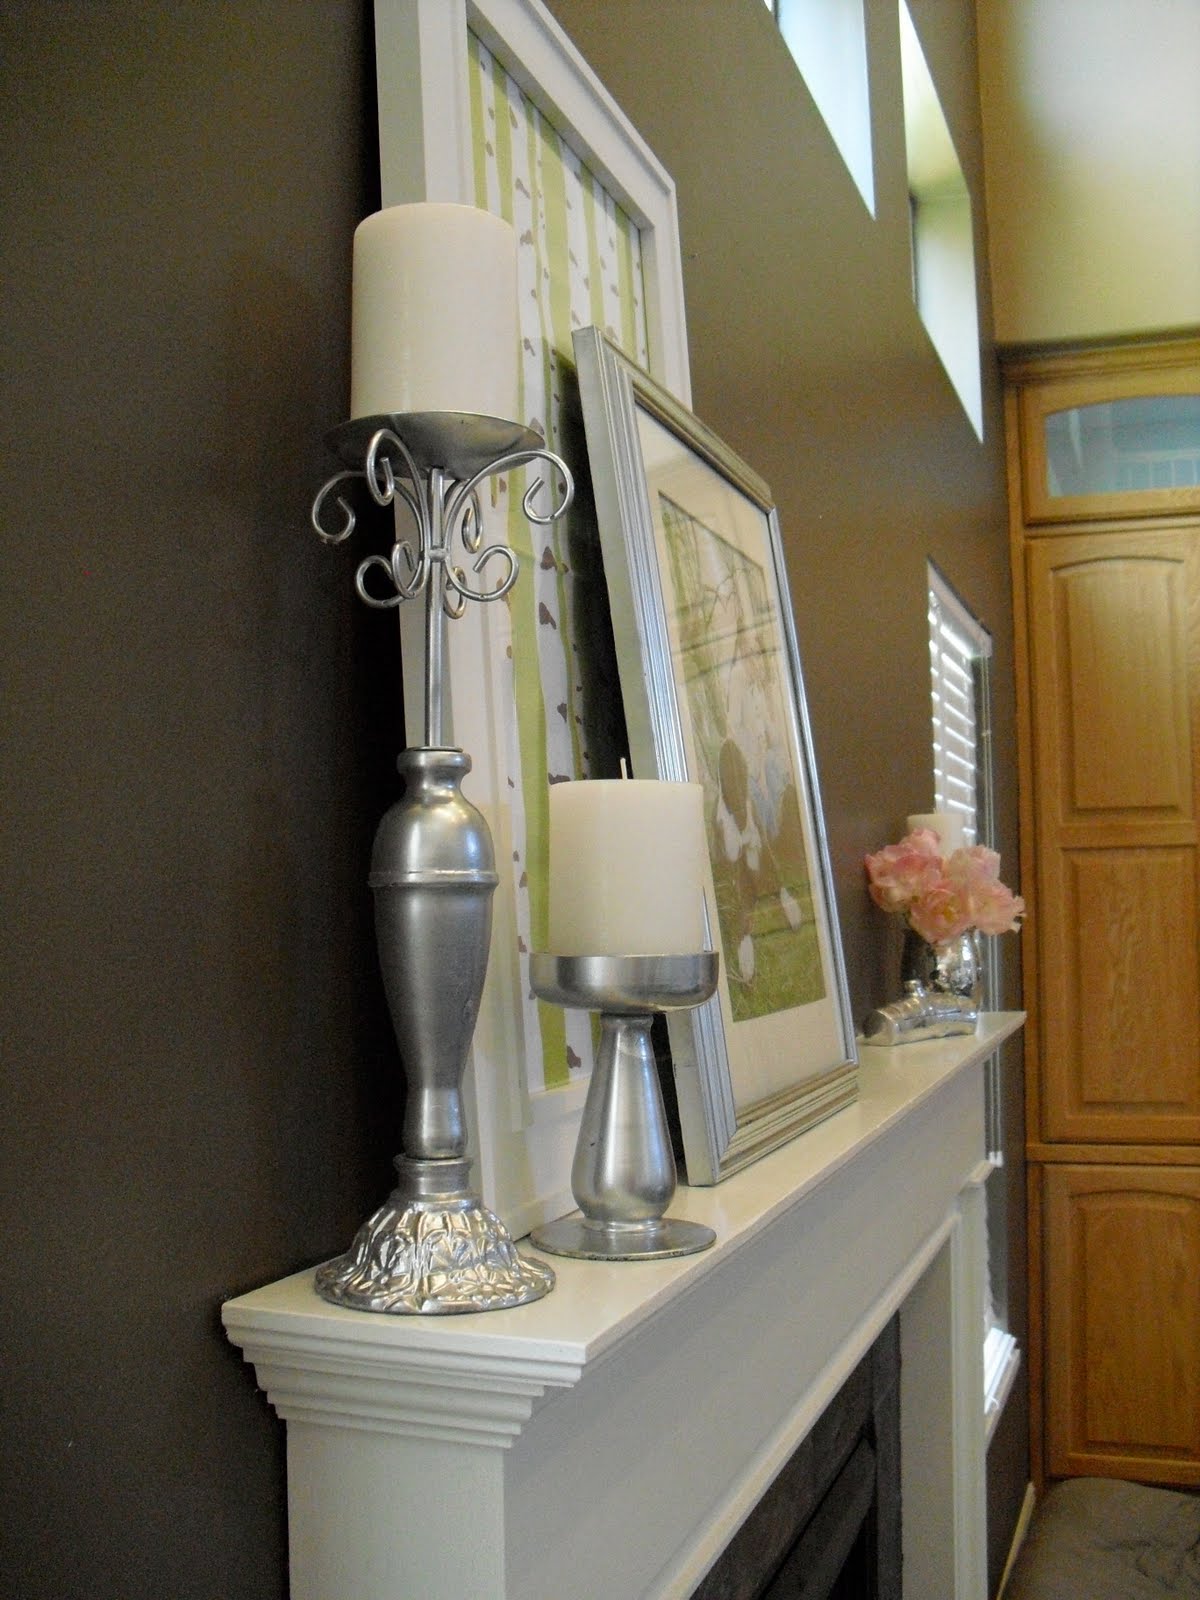
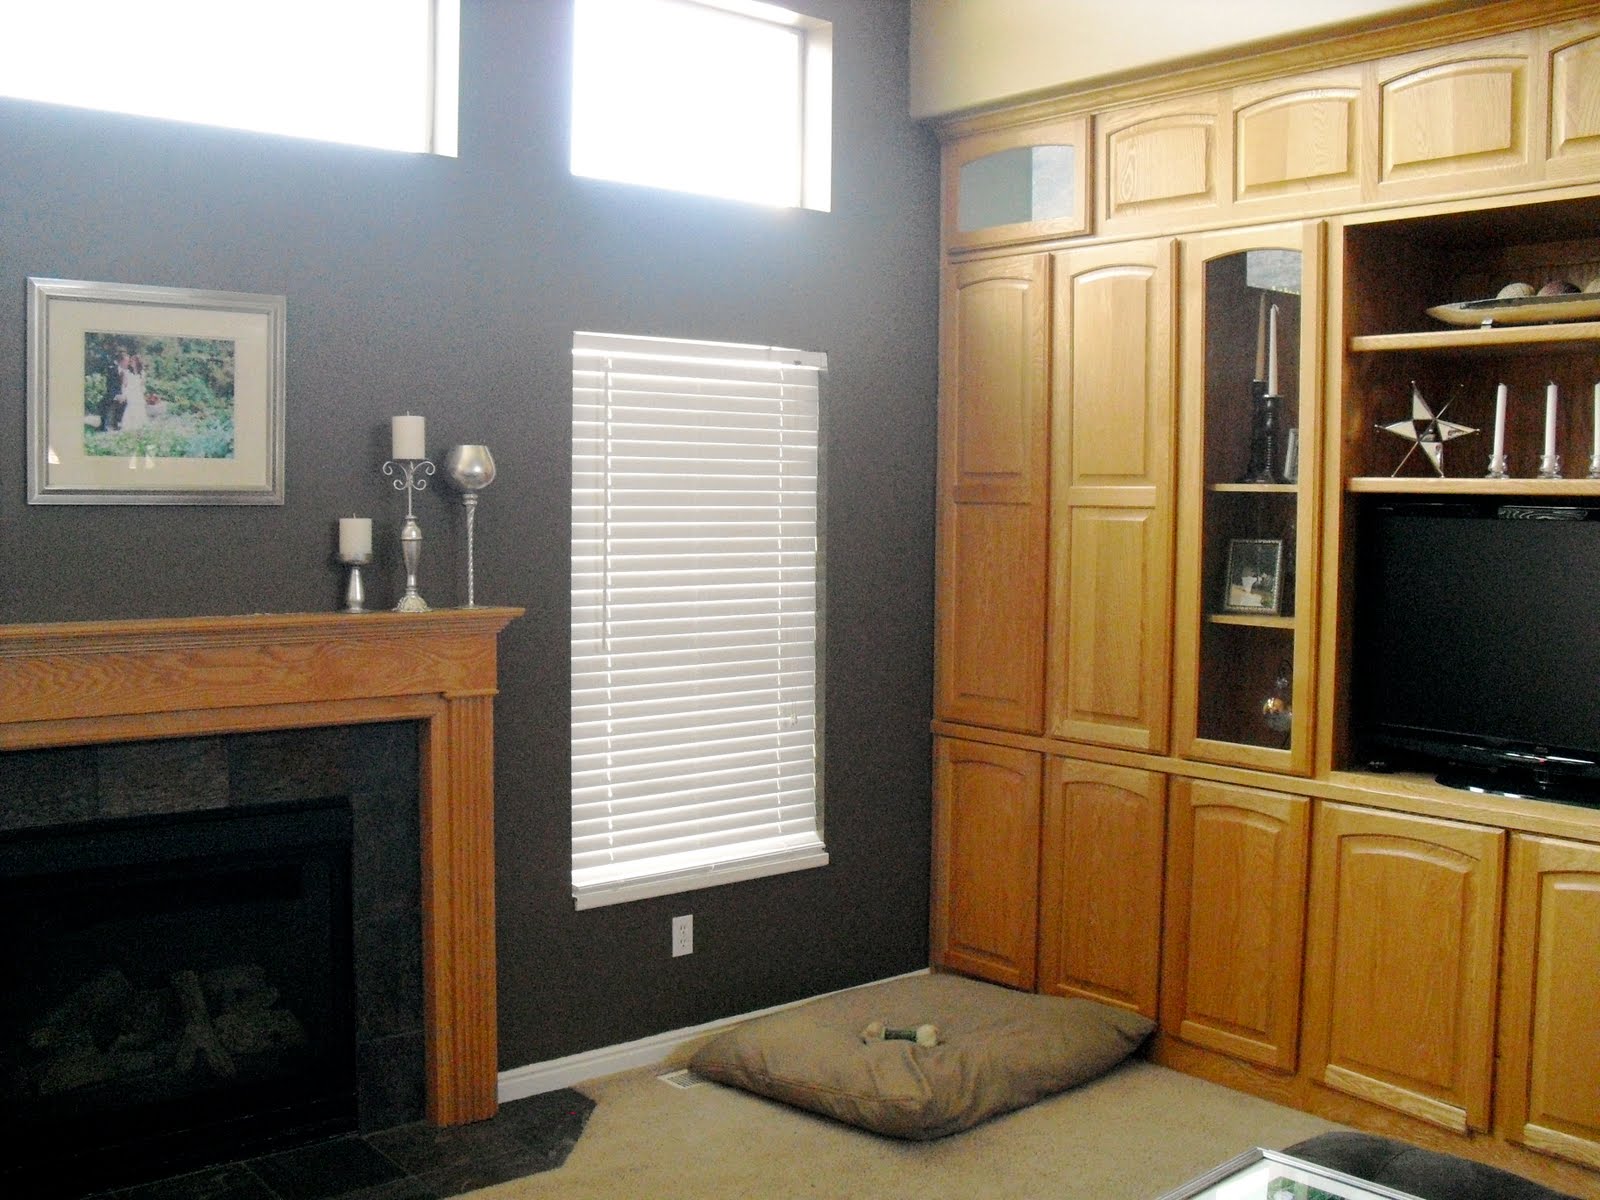
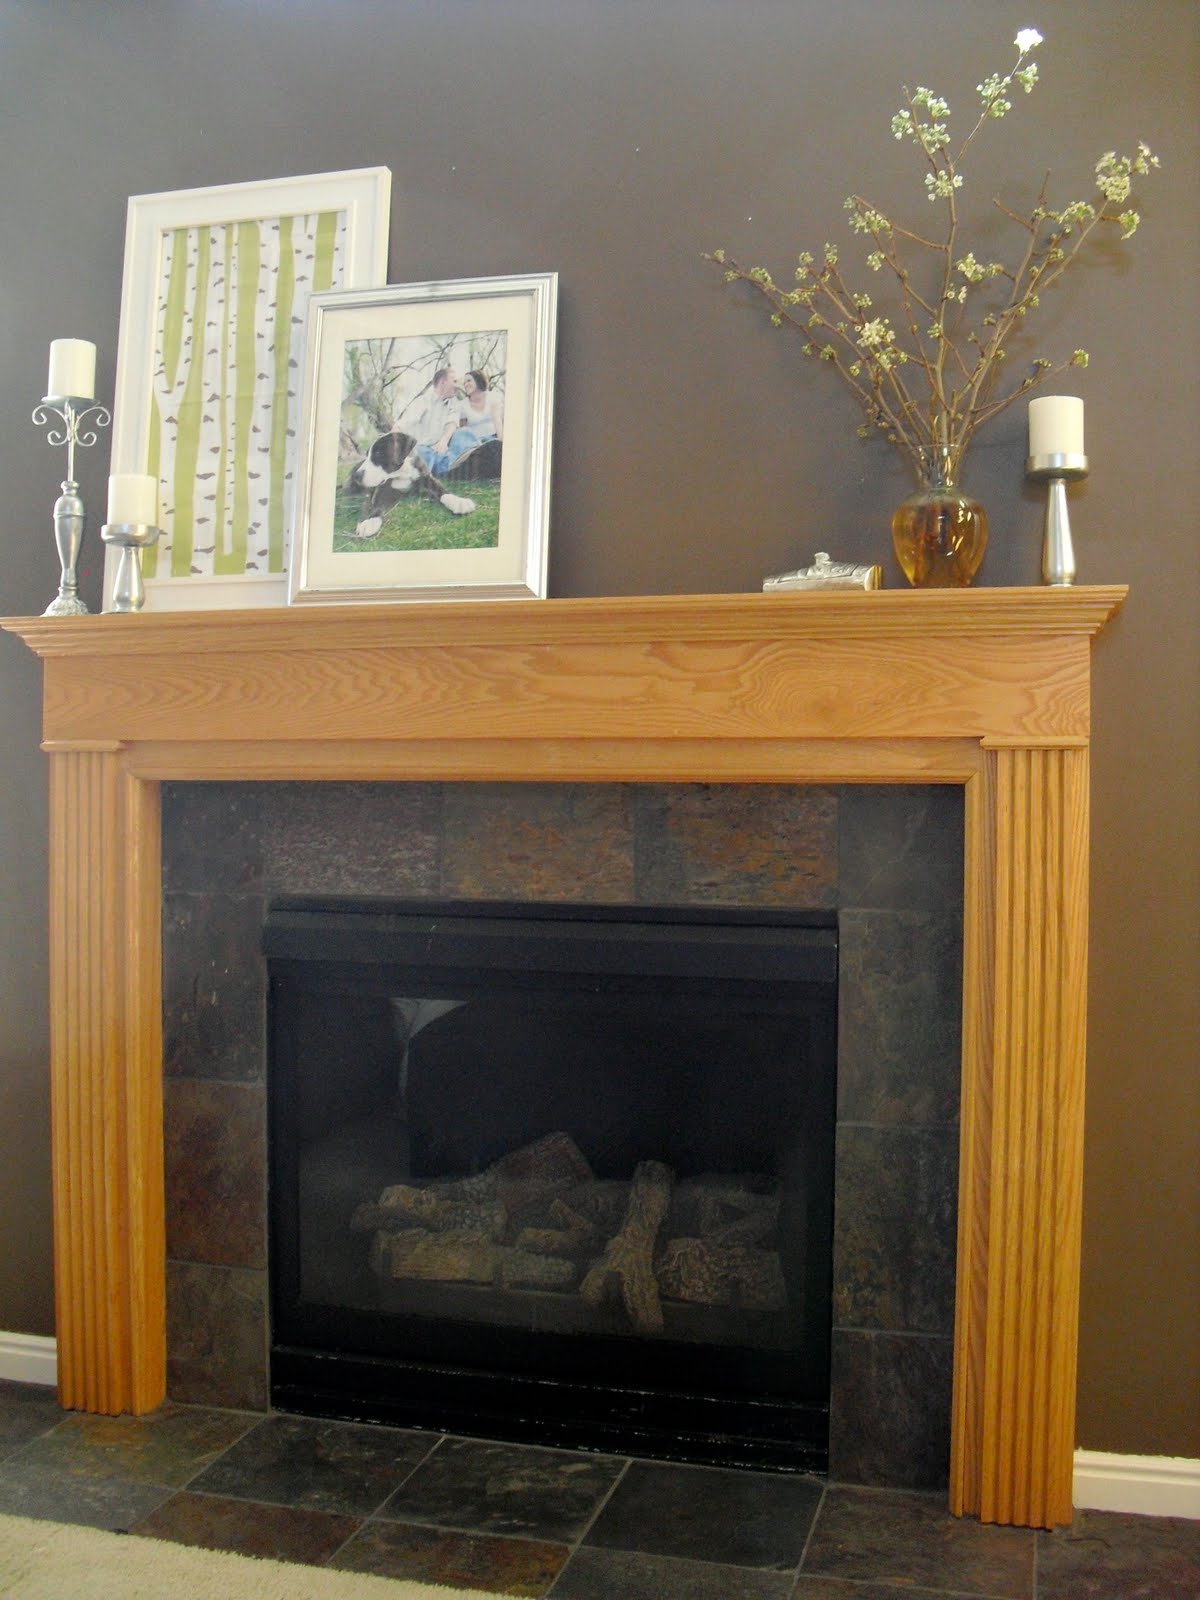
And here's what it looks like now. Don't mind the white paint splatters on the wall, I was too excited about how good it looked, I didn't want to wait until I could tape it and patch up the mess ups.
 

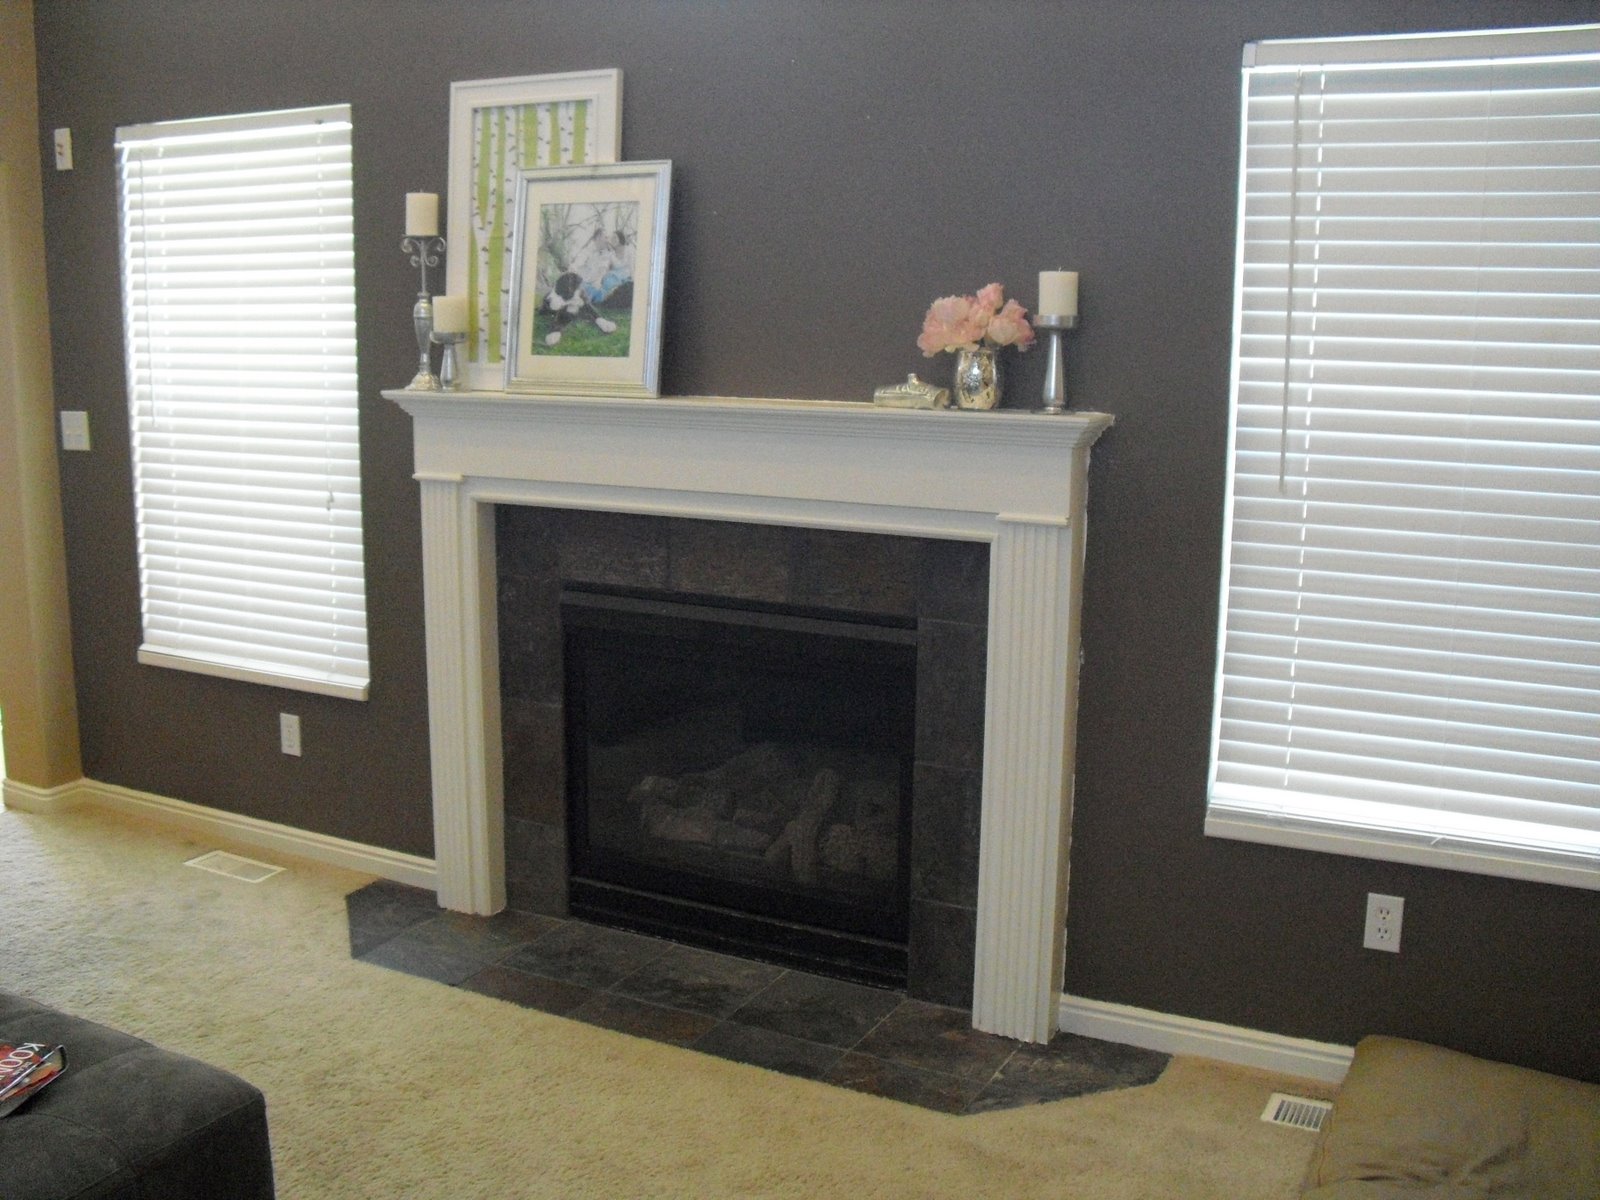
I love how it turned out. I think it highlights the slate tile and pops off the brown wall quite nicely. It was super easy to do.

First I applied a good thick coat of lacquer remover and allowed that to sit for 30 minutes. Then I used a scraper to remove it from the flat parts and steel wool for the real detailed parts. Then I rinsed off all the wood with water and allowed it to dry. Then I did a quick sanding with some coarse and then fine sandpaper, wiped it down again and let it dry.

The last step was to apply two thin layers of white paint (mine is Fencepost by Behr)with a nice brush. Make sure that you fully let your first coat dry before you start your second. I let my first coat dry overnight and then did my second. I still need to do a coat of poly to really protect it but for now the high gloss paint should hold up okay.


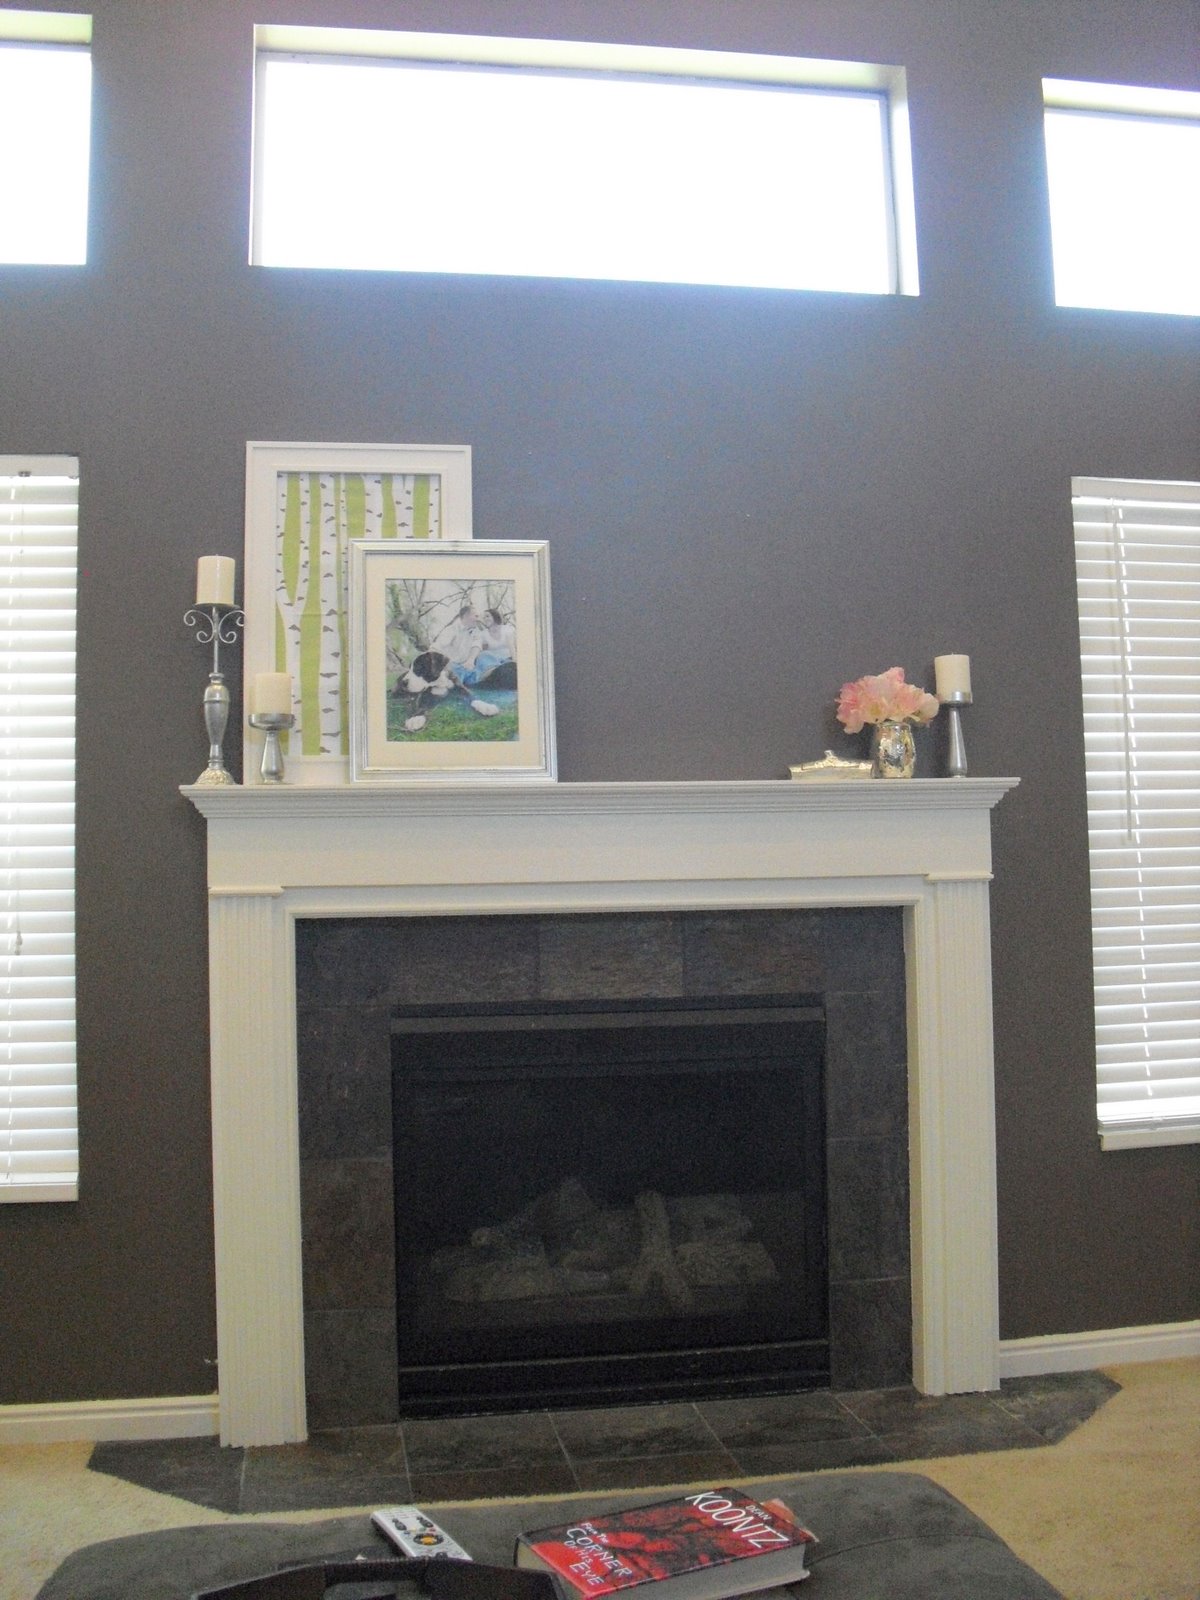
I couldn't be more pleased with how it turned out. Now I just need to tackle the cabinets and banister.
 

Tuesday, May 18, 2010

It's a box

For the most part since we moved into our house, our efforts have been on the inside. Let’s face it, we moved into the house in January and I would guess we spend 90% of our time inside our house so it really makes sense we would focus on that first. It also might be explained by the fact the yard was covered in snow when we bought the house so the disaster waiting for us was unknown and buy the time the snow melted, we were knee deep in house stuff. We pretty much picked up all the junk that was left under the snow. I’m not talking a toy here and some paper there. We found bats, dishes, pillows, blankets and random tools in our backyard when the snow melted. Yikes.

Last summer my husband basically spent his time outside fighting weeds and that is about it. Having secondary water is a blessing and a curse sometimes. It’s super cheap and we don’t feel guilty actually watering our grass but it comes with all sorts of weed seeds in it.

One of the things we loved about the backyard when we were looking for houses was the separate garden area. It’s completely fenced off from the rest of the yard which meant I could get my puppy and not worry about him ruining our garden. The previous owners had some garden boxes set up but they negotiated to take them with them. The first year we pretty much planted seeds in the dirt mounds left by the boxes and called that good. The garden was surprisingly successful.

Because things have settled down inside the house, my focus has turned to the outside which any husband can tell you, leads to lots of projects. The first item of business, get the garden in great shape and make sure we do it right for minimal maintenance down the road. Because we have so much space in the garden, we decided putting garden boxes in the space would be the best idea. That way we could have paths in-between the boxes to allow ample space for weeding and gardening without having to kneel in dirt. We did opt to leave one space open for dirt our vine plants to grow and flourish. I’m determined to have my own pumpkin to carve this year dang it!

When we started talking to people and pricing out our garden box options, I was shocked at how much they cost. I was really leaning towards getting white vinyl boxes to match our fences and to last forever and look clean and nice forever too. One of our local vinyl fence companies quoted us $150 per box. Yikes. I’m not going to be saving any money growing my own veggies at that rate especially considering we needed about 10 boxes. I then thought about doing wood. I guess it won’t look that bad if I paint it and I wasn’t too excited about the extra maintenance or possibility of slivers down the road but even pricing those out was about $100 per box. Still not what I was looking to pay – I’m cheap!

While wandering around Home Depot one day, I had an idea. Why can’t I just by a vinyl fence panel ($50), cut it up into pieces and assemble it into my own garden box? Sure the edges won’t be perfect and I’ll have to use bolts to fasten them together but they will be cheap, functional and look pretty dang good if I may say so myself. Because the panels come in 6’x6’ squares, my garden boxes will be a bit smaller than I was thinking but honestly I hated how big our piles of dirt were last year while I was trying to pick peas and beans. There were too wide and long to get to the middle so smaller than standard garden boxes honestly sounded like a great plan to me.

Why is it that coming up with a plan is so much easier than cutting, drilling and assembling 18 garden boxes?

Sunday, May 2, 2010

Mobiles are for everyone

So recently a lot of the people whose blogs I've been reading have been having babies. Because of that, I have seen so many adorable baby room ideas. Since I know a baby is still a few years away for us, putting any of those awesome ideas to work really isn't going to happen. Then I started thinking about the blank space above the bookcase in our guest room.

The tall ceilings in this room have made it a bit more difficult. There's so much more space to fill. So much space that could be filled up nicely with a modern, clean, adult looking mobile. Sold!

I started thinking about what I could hang from the ceiling that is sleek and delicate yet still gives a nod to the beachy theme of the room. That's when I thought about getting some clear glass Christmas ornaments, taking off the tops so they wouldn't obviously scream I'M A CHRISTMAS ORNAMENT!

I popped on over to save-on-crafts.com where I found a couple different sizes of clear glass ornaments (in April!). Also while exploring the sight, I found some super cheap sea glass in different colors and some star fish as well. Perfect.

I started off by getting out some thumb tacks that were a brassy color. I quickly fixed that with a quick spray with my white spray paint.


Then after taking the tops off of the clear ornaments, I started filling them with the different colored sea glass. After I had a few ornaments filled with glass, I took a bamboo skewer, cut it into 1 1/2" pieces and tied some upholstery weight thread to it. Then just because I didn't want any mobile related accidents, I hot glued the knot in place on the skewer. I popped the bamboo into the ornament and made sure it was secure. Then I tied the other end of the thread onto the thumb tack and also hot glued the tack to the ceiling also for safety's sake.

Here's what the first one looked like.


After putting up all the ornaments with glass, I then glued a few of the star fish to upholstery thread and hung those too. I couldn't be more pleased with the results.


I love how light and airy it turned out, plus it's the first item that has helped me incorporate my new accent color, PINK!

Friday, April 23, 2010

Out With The Old

I'm back with another project from our guest room. As you can see in the before pictures, the bed has a dark brown upholstered headboard which was just fine except it was just a piece of Styrofoam covered with batting and fabric screwed to the wall. It looked okay but was really flimsy and screwed to the wall.


When this was our bed, we had a super cheap dark brown headboard I shoved in the closet in this room because it was not attractive, not comfortable to lean against and because it was cheap, it was also kind of flimsy so when you did lean against it, you were pretty much guaranteed to dent the wall.

I'm planning on painting the way too bright teal blue accent wall with the same wall color as the rest of the walls so I wanted to make a new headboard with a blue green fabric to keep some of that color in the room. I ventured down to Joann's and found some ideal upholstery fabric on sale for $6 a yard. It was really a light gray blue so I also picked up a $2 box of kelly green RIT dye along with my two yards of fabric. One washing machine load later, I had the perfect light blue green color fabric. I may have jumped up and down in the laundry room when I took the fabric out of the dryer.

In an effort to remedy the issues I had with the previous headboards, I opted to combine the two. I hot glued the Styrofoam onto the old ugly dark brown, reused the batting and upholstered it with the new fabric. I didn't take pictures because I know there are a thousand other DIY upholstered headboard tutorials out there. Just google it, you won't be disappointed.

I am super pleased with the results. Now I have a comfortable, solid, portable headboard in the perfect blue green color.

While I was filling the holes left from the previous headboard, I also took the time to fasten down the lamp cords and paint them the same color of the wall. I know it is nowhere near hiding them but at least they aren't all twisted and hanging how ever they want and are now the same color as the wall. Eventually I will find a much more attractive lighting solution.

Here is the finished headboard in all it's glory. The guest room is really starting to look better and better everyday.

Thursday, April 22, 2010

The Couch Has Some Fun

A few weeks ago I realized my family room was lacking. Beside having a super formal mantle arrangement, the couch was very brown and boring. Now, I'm all for expensive and hard to change things being neutral so getting my dream sectional in dark brown was a no brainer. That also explains why the huge walls in the room are neutral colors because renting scaffolding to paint a room is a little too much work for me just to get a new color every few years. The brown couch is dark to hide the dirt, brown to coordinate with the slate tile and brown accent wall. Plus it doesn't hurt that our dog is dark brown too.

The red pillows that never got put away after Christmas really weren't helping either. Sure they matched the kitchen wall color but they really were doing nothing else for the room.

I turned to the only thing I know that can spruce up a couch without reupholstering (expensive!) or buying a new couch (even more expensive!). I made new pillows in some fun new prints.

I knew I wanted to add some green for a few reasons. 1) Both of the pictures on the mantle have different shades of green and 2) Green is my FAVORITE color and 3) It's in just about all the other rooms in our house so adding some green will help tie the rooms together a bit better.

I really wanted to find a green giraffe print fabric since seeing the most ideal square tray in a green giraffe print at Z Gallerie on clearance for $30 one day. That baby so would have been mine if I hadn't been in Long Beach, CA for a work trip when I stumbled upon it. I did debate in the store for a good 30 minutes to see if I could figure out some way to get a 30 inch square tray on the plane home without spending $30 for the additional baggage it would cost me. Since you don't see it in the picture above, I'm sure you've guessed it didn't come home with me and my Z Gallerie didn't have one (on clearance or not).

After seeing some great printed fabric on a few other blogs I popped over to Premier Prints to see if they had my green giraffe fabric. It must have been my lucky day because they did. They also had a bunch of other awesome prints that happened to find there way into my cart. Weird how that happens.

On a trip to Ross a few weeks ago, I also found some fab green pillows for $6 bucks each so those ended up in my cart too.

The last pillow was actually a placemat from Pier One. Hello $3 embroidered pillow.

I think the pillows with one of my favorite throws that matches the lime green in my tree print perfectly make my brown couch look so much fresher. What do you think?


Now I just need to paint the mantle, cabinets, railing, maybe make a slip cover for the ottoman and add a few new fun accessories.

Tuesday, April 20, 2010

Green, Green, Green

As with our guest room, when we first moved in, we bought the sectional I had been lusting for (I may have had this couch in mind when we were house hunting and refused to consider a house that didn't have a family room I could put my sectional in). Painted the walls and stuck a picture over the mantle and moved on to more important things. Like removing the carpet in our master bathroom (EEWW!).

Also just like the guest room, I'm just now getting really annoyed by the lack of color and the ugly oak cabinets in our family room. Here are a few pictures of the before.


These are obviously from before we moved in, while we were cleaning the place. Don't mind the vacuum and pile of clothes in the dining room.

Here are a few pictures from only a few weeks ago.


Notice the red pillows left out from Christmas still (whoops!) and the way too formal candlesticks on the mantle. Also don't mind the fact that it was a little too bright outside to be taking pictures. This room is tricky to get a good picture on the fireplace wall with good day lighting.

Also notice one of the first projects we tackled in this house, the fireplace tile. I couldn't wait to get rid of the boring beige builder tile and since we put slate in our bathroom to replace the carpet, continuing the slate seemed like a good option. I love the texture and all the different colors.

This time around, first place I tackled were the accessories on the mantle. I liked the candlesticks and our wedding picture but felt the family room needed a more casual vibe. After all, the sectional was purchased because of it's extreme comfort.

Here's what I came up with.


I think it's safe to say I absolutely love it. The picture of us with our puppy was taken my the same wonderful photographer that did our wedding, Stacy Marie. Check out her website and blog for some of her stunning photographs. I opted to reuse a few of the candlesticks and candles and the tree print is actually a tea towel from Tikoli. Love.

By leaning the pictures on one side and offsetting them with some forced branches, I think I got the casual vibe I was going for. Next to tackle, the brown couch.

Monday, April 19, 2010

It's a Slow Process

Since we moved into our house, it's been a slow process adding character. Here's a picture of our master bedroom before we moved in since I don't have one of our guest room before I started making changes.

Really you can't blame me, I think I fell asleep on my way up the stairs to take pictures of the other rooms.

The guest room looks pretty much the same, just smaller and with no window on the wall on the left hand side of the picture.

When we moved in, we got new bigger furniture for our room, the guest room pretty much got all of our old furniture. I slapped some paint on the walls added a few accessories and moved onto other rooms that we spend much more time in. Since I've knocked off some other things on my list so I've been able to concentrate a little bit more on the sadness of the room. Here's what it looked like after the first go around.


Better than white but not as amazing as it could be. I really wanted to keep the beach ocean theme but it everything on the walls were the wrong proportion, the accessories were too small and made things feel even more empty, and I felt like there weren't any great popping colors to give the room energy. All things I am aiming to change this time around.

My first change was incorporating a great Willow House product. I love these candle holders but they actually aren't available anymore. I added a few pieces of sea glass that I had leftover from another project for this room that I'm going to share in a bit. I think these are much better proportioned for the room.

I think their replacement is even better. I wish I had them right now to switch out.